Embarking on the journey of growing your own wheatgrass for juicing is a rewarding experience that connects you directly with nature’s potent goodness. As the Admin of JuicerBest.com, with over a decade of deep expertise in juicing technology and healthy living, I’ve seen firsthand the transformative power of fresh, vibrant wheatgrass juice. This guide will walk you through every step, ensuring you cultivate a lush, nutrient-dense crop right in your home. Get ready to unlock the secrets to perfect homegrown wheatgrass and elevate your daily juicing routine.
Understanding Wheatgrass and Its Benefits
Wheatgrass, the young grass of the common wheat plant (Triticum aestivum), is celebrated worldwide as a superfood. It’s renowned for its impressive nutritional profile, packed with vitamins, minerals, amino acids, and enzymes. Most notably, it is an exceptional source of chlorophyll, often referred to as “plant blood” due to its molecular similarity to human red blood cells. Incorporating fresh wheatgrass juice into your diet can support natural detoxification, boost energy levels, and contribute to overall well-being. By growing it yourself, you ensure maximum freshness, control over quality, and a significantly more cost-effective supply compared to store-bought options.
Essential Supplies for Growing Wheatgrass
Before you begin, gathering the right tools will set you up for success. You don’t need a professional setup, just a few key items readily available.
- Wheat Berries (Seeds): Opt for organic hard red winter wheat berries. These are raw, unprocessed wheat kernels specifically meant for sprouting, not for milling into flour. You can find them at health food stores, online, or sometimes at local farmer’s markets.
- Growing Trays: Shallow trays, about 1-2 inches deep, are ideal. These can be specific seed-starting trays, repurposed plastic containers, or even cafeteria trays. Ensure they have drainage holes to prevent waterlogging, or prepare pebbles if yours do not.
- Potting Mix: A good quality organic potting soil is best. Some growers also recommend a mix of compost and vermiculite for optimal growth and nutrient supply. The key is a light, well-draining medium.
- Soaking Container & Colander: A clean bowl or mason jar for soaking the seeds and a colander for rinsing them are necessary.
- Watering Tools: A spray bottle is highly recommended for gentle, even watering, especially in the early stages, to avoid disturbing the young sprouts.
- Harvesting Tools: A sharp pair of kitchen scissors or a clean knife will be perfect for harvesting your grass.
- Juicer: While any juicer can extract some liquid, a masticating juicer (also known as a slow or cold-press juicer) is highly recommended for wheatgrass. These juicers press and grind the grass slowly, minimizing heat and oxidation, which preserves more of the delicate enzymes and nutrients. Centrifugal juicers, while faster, can generate heat that may diminish the nutritional value of your juice.
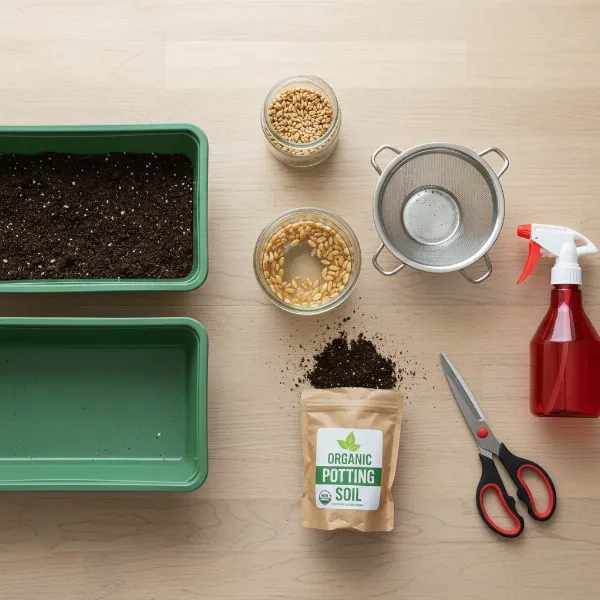 Essential supplies for growing your own wheatgrass at home for juicing, including seeds, trays, and a spray bottle.
Step-by-Step Guide to Cultivating Wheatgrass
Growing wheatgrass is a straightforward process, typically taking 7-10 days from seed to harvest. Follow these steps for a bountiful yield.
Step 1: Prepare Your Seeds (Soaking & Sprouting)
|
Our Picks for the Best Juicer in 2026
As an Amazon Associate I earn from qualifying purchases.
|
||
| Num | Product | Action |
|---|---|---|
| 1 | BLACK+DECKER 32oz Electric Citrus Juicer, CJ625, Pressure Activated, Adjustable Pulp Control, Dishwasher-Safe |

|
| 2 | juicer machines with 5.8" Large Feed Chute, Slow masticating cold press juicer for Whole Fruits & Vegetables, easy to clean Design, High Juice Yield Home juicer for Daily Wellness |
|
| 3 | Qcen Juicer Machine, 500W Centrifugal Juicer Extractor with Wide Mouth 3” Feed Chute for Fruit Vegetable, Easy to Clean, Stainless Steel, BPA-free (Black) |
|
| 4 | Juicer Machines, Juilist 3" Wide Mouth Juicer Extractor Max Power 800W, for Vegetable and Fruit with 3-Speed Setting, 400W Motor, Easy to Clean |
|
| 5 | Ninja NeverClog Cold Press Juicer, Powerful Slow Juicer with Total Pulp Control, Countertop, Electric, 2 Pulp Functions, Dishwasher Safe, 2nd Generation, Charcoal, JC151 |
|
| 6 | Zulay Kitchen Cast Iron Juicer - Easy-to-Clean Heavy-Duty Manual Juicer, Professional Citrus Juicer - Stainless Steel Lemon Squeezer - Manual Citrus Press & Orange Squeezer - Orange Juicer (Black) |
|
| 7 | Qcen Juicer Machine, 800W Centrifugal Juicer Extractor with Wide Mouth 3” Feed Chute for Fruit Vegetable, Easy to Clean, Stainless Steel, BPA-free (Black) |
|
| 8 | Cold Press Juicer, Juicer Machines with 5.4" Wide Feed Chute for Juice Extractor, Professional Slow Masticating Juicer for Whole Vegetables & Fruits with High Juice Yield, Easy to Clean (Black) |
|
| 9 | Juicer Machines with 5.8" Large Feed Chute, Cold Press Juicer for Whole Vegetables and Fruits 400W, Slow Masticating juicer Easy to Clean Juice Extractor Machine High Juice Yield |
|
| 10 | Magic Bullet Mini Juicer with Cup, Black and Silver |
|
The first crucial step is to awaken your wheat berries. Begin by soaking them in water to initiate germination. Place your desired amount of wheat berries (approximately 1 cup for a standard 10×20-inch tray) in a clean bowl or mason jar. Cover them with ample water, ensuring they are fully submerged, and let them soak for 8-12 hours at room temperature. After soaking, drain the water using a colander and rinse the seeds thoroughly. Continue rinsing the seeds 2-3 times a day for the next 1-2 days, keeping them in the colander in a cool, dark place. You’ll notice small white tails, or sprouts, beginning to emerge from the seeds – this indicates they are ready for planting.
Step 2: Set Up Your Growing Trays
Prepare your growing trays by cleaning them thoroughly, ideally sterilizing them with a diluted bleach solution (1 part bleach to 9 parts water) and rinsing well, especially if reusing. Add a ½ to 1-inch layer of your chosen potting mix into the tray. If your tray lacks drainage holes, add a layer of small pebbles at the bottom before the soil to prevent root rot. Gently moisten the soil, ensuring it is damp but not waterlogged. The goal is moist, crumbly soil, not standing puddles.
Step 3: Planting the Sprouted Seeds
Once your seeds have sprouted and your trays are prepared, it’s time to plant. Evenly spread the sprouted wheat berries over the surface of the moist soil. Aim for a single layer of seeds, covering the entire surface without clumping them together. Gently press the seeds down into the soil to ensure good contact. You can then sprinkle a very thin layer of loose soil over the seeds, but do not cover them completely. The sprouts need to easily push through to the light.
Step 4: Nurturing Your Wheatgrass (Watering & Light)
Place your planted trays in an area with indirect sunlight. A north-facing window, a shaded patio, or under artificial grow lights (if available) are all excellent choices. Maintain a consistent room temperature, ideally between 60-80°F (15-27°C). To encourage initial growth and maintain humidity, you can create a mini-greenhouse effect by loosely covering the tray with a clear plastic lid or plastic wrap, making sure to poke a few holes for air circulation. Remove the cover once the grass is about 1-2 inches tall, typically around day 4.
Water your wheatgrass daily using a spray bottle. Keep the soil consistently moist but never oversaturated. Overwatering is a common cause of mold. If you live in a dry climate, you might need to mist more frequently. Observe your grass; if it starts to yellow or the blades thin, it might be underwatered.
Step 5: Preventing and Managing Mold
Mold can occasionally appear as white, fuzzy patches on the soil or at the base of the grass, often due to overwatering or poor air circulation. To prevent mold, ensure adequate airflow by not completely sealing your covers and removing them once the grass is established. Water carefully with a spray bottle, focusing on the soil rather than soaking the blades. Some growers suggest adding a teaspoon of baking soda to a liter of water for occasional watering to help deter mold. If mold does form, cut the grass above the affected area during harvest, or discard the batch if mold is widespread or concerns you. Always sterilize trays before reusing them if mold was an issue.
Harvesting Your Homegrown Wheatgrass
Your wheatgrass is ready for harvest when it reaches a height of approximately 7 inches (about 18 cm), usually around 7-10 days after planting. At this stage, the grass has reached its peak nutritional density.
To harvest, use clean, sharp scissors or a knife to cut the blades just above the seed level, about an inch from the soil. This allows for a potential second growth. While wheatgrass can regrow, it’s important to note that the second cutting will have significantly less nutritional value than the first. For optimal benefits, many enthusiasts prefer to plant new seeds for each batch rather than relying on regrowth. Harvested wheatgrass should be juiced and consumed immediately for the highest nutritional benefit.
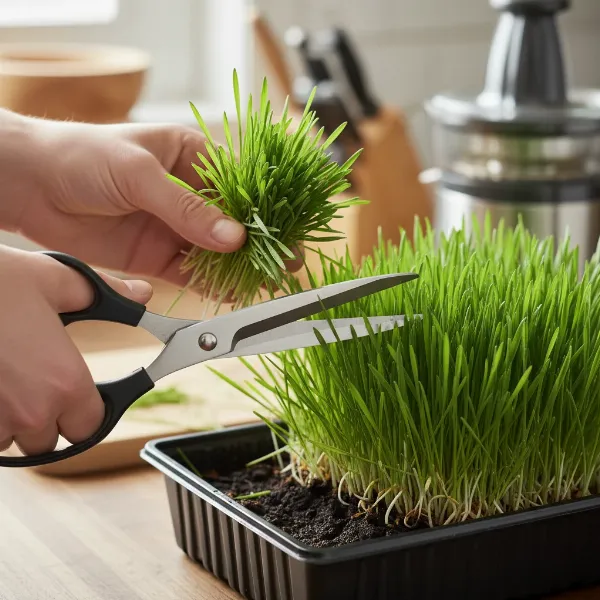 Harvesting fresh wheatgrass for immediate juicing with scissors, showing vibrant green blades.
Juicing Your Fresh Wheatgrass
Wheatgrass is highly fibrous and indigestible by humans in its whole form. To unlock its potent nutrients, it must be juiced.
As mentioned, a masticating (cold-press) juicer is the top choice for wheatgrass. Its slow crushing action extracts the maximum amount of juice while preserving heat-sensitive enzymes. If you only have a centrifugal juicer, use it on the lowest speed setting to minimize heat, though some enzymatic loss may occur.
For a pure, potent shot, juice the wheatgrass straight. However, its intense, earthy, and slightly sweet flavor can be strong for some palates. Many find it more palatable when mixed with other juices. A splash of lemon juice can counteract the sweetness, while carrot juice provides a delicious and nutritious blend. Experiment with apple, cucumber, or ginger to find your perfect mix. Aim to drink your wheatgrass juice immediately after preparation to benefit from its freshest and most potent state.
> “Growing your own wheatgrass is not just about health; it’s about reclaiming a piece of your well-being with every fresh, vibrant blade you harvest. It’s truly a daily dose of sunshine for your body.” – Admin, JuicerBest.com
Conclusion
Growing your own wheatgrass for juicing is a simple, fulfilling, and economical way to incorporate a powerful superfood into your diet. From selecting the right wheat berries to mastering the art of harvesting, each step contributes to a fresh, nutrient-rich juice that supports your health and vitality. With this guide, you’re now equipped to transform your kitchen into a miniature green pharmacy. Why wait to experience the incredible benefits of fresh wheatgrass?
Ready to grow your own liquid sunshine? What combination of fruits or vegetables will you first try with your freshly juiced wheatgrass?
Frequently Asked Questions
What are the main benefits of drinking wheatgrass juice?
Wheatgrass juice is highly acclaimed for its rich content of chlorophyll, vitamins (A, C, E, K, B complex), minerals (iron, calcium, magnesium), amino acids, and enzymes. It’s often praised for its detoxifying properties, ability to boost energy, support digestion, and enhance overall cellular health. Many find it a powerful natural immune booster.
Can I grow wheatgrass without soil?
Yes, wheatgrass can be grown without soil using hydroponic methods, often on paper towels or mesh trays. While this method can be cleaner and faster, many experienced growers believe that soil-grown wheatgrass offers a more complete nutrient profile and robust growth due to the trace minerals absorbed from the soil.
How much wheatgrass juice should I drink daily?
For most individuals, a small shot of 1 to 2 ounces (30-60 ml) of fresh wheatgrass juice per day is sufficient to experience its benefits. Due to its potent detoxifying effects, it’s often recommended to start with a smaller amount and gradually increase it as your body adjusts.
Why does my wheatgrass sometimes get moldy?
Mold on wheatgrass is a common issue often caused by overwatering or insufficient air circulation. To prevent this, ensure your trays have good drainage, avoid oversaturating the soil, and provide plenty of airflow by not covering the grass too tightly or removing covers once sprouts emerge. A light baking soda solution can also help.
Can I get more than one harvest from my wheatgrass seeds?
While wheatgrass can sometimes produce a second harvest, the nutritional value of the subsequent growth is significantly lower than the first cutting. For the highest concentration of beneficial compounds, it is generally recommended to use only the first harvest for juicing and then start a fresh tray of seeds.
What kind of wheat seeds are best for growing wheatgrass?
For growing wheatgrass, it is best to use organic hard red winter wheat berries. These are raw, unprocessed, and specifically intended for sprouting. They germinate reliably and produce strong, vibrant grass ideal for juicing. Always look for seeds labeled “for sprouting” to ensure they haven’t been treated or processed in a way that inhibits growth.