There’s nothing quite like a glass of fresh, homemade juice to kickstart your day or provide a healthy boost. But let’s be honest, the thought of cleaning a juicer can quickly turn that joy into dread. All those nooks, crannies, and stubborn pulp can make the cleanup feel like a marathon. What if I told you it doesn’t have to be? With the right techniques and a few clever tricks, you can master how to clean your juicer in under 5 minutes, ensuring you spend more time enjoying your nutritious drinks and less time scrubbing.
Types of Juicers and Their Quick Cleaning Nuances
While the core principles of juicer cleaning remain consistent, understanding your specific type of juicer can help streamline the process. Whether you own a centrifugal or a masticating (slow) juicer, quick disassembly and immediate rinsing are your best friends.
Centrifugal Juicers
|
Our Picks for the Best Juicer in 2026
As an Amazon Associate I earn from qualifying purchases.
|
||
| Num | Product | Action |
|---|---|---|
| 1 | Qcen Juicer Machine, 800W Centrifugal Juicer Extractor with Wide Mouth 3” Feed Chute for Fruit Vegetable, Easy to Clean, Stainless Steel, BPA-free (Black) |

|
| 2 | Zulay Kitchen Cast Iron Juicer - Easy-to-Clean Heavy-Duty Manual Juicer, Professional Citrus Juicer - Stainless Steel Lemon Squeezer - Manual Citrus Press & Orange Squeezer - Orange Juicer (Black) |
|
| 3 | Qcen Juicer Machine, 500W Centrifugal Juicer Extractor with Wide Mouth 3” Feed Chute for Fruit Vegetable, Easy to Clean, Stainless Steel, BPA-free (Black) |
|
| 4 | juicer machines with 5.8" Large Feed Chute, Slow masticating cold press juicer for Whole Fruits & Vegetables, easy to clean Design, High Juice Yield Home juicer for Daily Wellness |
|
| 5 | Juicer Machines with 5.8" Large Feed Chute, Cold Press Juicer for Whole Vegetables and Fruits 400W, Slow Masticating juicer Easy to Clean Juice Extractor Machine High Juice Yield |
|
| 6 | BLACK+DECKER 32oz Electric Citrus Juicer, CJ625, Pressure Activated, Adjustable Pulp Control, Dishwasher-Safe |
|
| 7 | Ninja NeverClog Cold Press Juicer, Powerful Slow Juicer with Total Pulp Control, Countertop, Electric, 2 Pulp Functions, Dishwasher Safe, 2nd Generation, Charcoal, JC151 |
|
| 8 | Magic Bullet Mini Juicer with Cup, Black and Silver |
|
| 9 | Juicer Machines, Juilist 3" Wide Mouth Juicer Extractor Max Power 800W, for Vegetable and Fruit with 3-Speed Setting, 400W Motor, Easy to Clean |
|
| 10 | Cold Press Juicer, Juicer Machines with 5.4" Wide Feed Chute for Juice Extractor, Professional Slow Masticating Juicer for Whole Vegetables & Fruits with High Juice Yield, Easy to Clean (Black) |
|
These juicers operate at high speeds, using a spinning blade and mesh filter to separate juice from pulp. While fast, they tend to create more pulp residue that gets flung against the internal walls and the fine mesh screen. The key to quick cleaning here is tackling the mesh filter immediately before pulp dries and hardens.
Masticating (Slow) Juicers
Masticating juicers chew and press ingredients slowly, often resulting in drier pulp. Their design typically involves an auger (or twin gears) and a strainer. Pulp can get lodged in the auger’s spirals and the strainer’s small holes, as well as in silicone seals and flaps. Pay close attention to these components for a thorough, swift clean.
The 5-Minute Juicer Cleaning Checklist
The secret to a lightning-fast juicer cleanup is immediate action. Don’t let pulp and juice dry! Making this routine a habit will drastically cut down your cleaning time.
Step 1: Act Immediately & Disassemble
As soon as your last drop of juice is extracted, unplug your juicer. This is crucial for safety and efficiency. Then, systematically take apart all the removable components: the food pusher, lid, juice collection cup, pulp container, auger/blade, and screen/strainer. The faster you do this, the less chance pulp has to cling and harden.
Step 2: The “Water Rinse” Trick
For many vertical masticating juicers, a quick “self-rinse” can work wonders. After juicing, close the juice cap (if applicable), pour about 500ml of warm water down the feeding chute, and briefly turn the juicer on for about 30 seconds to a minute. This helps flush out a good amount of pulp before you even start disassembling. For centrifugal juicers, simply running warm water through the assembled machine for a few seconds can dislodge larger particles, though a full disassembly and scrub will still be needed.
Step 3: Brush Away Pulp with Precision
This is where your trusty cleaning brush (often included with your juicer) becomes invaluable.
- For the Screen/Strainer: This part is notorious for trapping fine pulp. Hold it under warm running water and vigorously scrub both sides of the mesh with the stiff-bristled brush. Work in a circular motion to dislodge all fibers.
- For Auger/Blade & Other Parts: Use the brush to scrub away any pulp from the auger, lid, and other components. For smaller spouts and crevices, a smaller brush or the pointed end of your juicer brush can reach those tricky spots. Pay extra attention to silicone seals, which can harbor residue and mold if not cleaned properly.
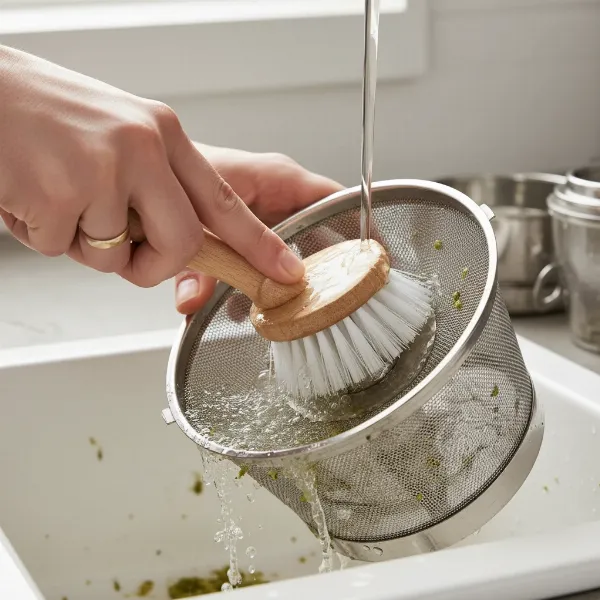 A stiff-bristled brush cleaning a juicer screen under running water, highlighting the effectiveness for quick juicer cleaning.
Step 4: Hot Soapy Water & Rinse
Once the majority of the pulp is removed, fill a sink or basin with warm water and a small amount of dish soap. Quickly wash all the scrubbed parts with a soft sponge or cloth. This step removes any oily residues and lingering flavors. Rinse everything thoroughly under clean running water until no suds or residue remain.
Step 5: Wipe the Base & Air Dry Completely
The juicer’s motor base should never be submerged in water. Instead, use a damp cloth to wipe down any splatters or dust. For a more thorough wipe, dampen a cloth with a solution of water and white vinegar to clean and sanitize the exterior. Once all the parts are clean, place them on a drying rack or a clean towel to air dry completely before reassembling. This prevents moisture buildup, which can lead to mold and bacterial growth, preserving your juicer’s lifespan and ensuring your next juice is fresh and hygienic.
Essential Tools for a Speedy Clean
Having the right tools at hand is crucial for making your juicer cleanup quick and painless.
- The Juicer Cleaning Brush: This is the MVP. Most quality juicers come with one, designed specifically to tackle the fine mesh screens and small openings where pulp loves to hide. If yours didn’t, invest in a good quality stiff-bristled brush.
- Dish Soap and Warm Water: The classic duo for dissolving residues and washing away grime.
- Soft Sponge or Cloth: For gently cleaning larger components and wiping down the motor base.
- Optional: Bottle Brush: Excellent for reaching into narrow spouts and chutes that a regular brush might miss.
- Optional: Drying Rack: Ensures proper air circulation for thorough drying, preventing mold.
Tackling Stubborn Stains and Buildup
While the 5-minute routine is perfect for daily maintenance, sometimes stubborn stains or mineral buildup can occur, especially if cleaning is occasionally delayed. When your juicer needs a deeper clean that goes beyond the quick daily routine, natural solutions are highly effective.
- Baking Soda Paste: For tough stains on plastic parts, mix baking soda with a little water to form a paste. Apply it to the stained area, let it sit for a few minutes, then scrub gently with a brush or sponge. Baking soda’s mild abrasiveness helps lift stains without scratching surfaces.
- Vinegar Soak: White vinegar is a natural disinfectant and powerful against mineral deposits and odors. For discolored plastic parts or persistent residue, soak the components (excluding the motor base) in a 1:1 solution of white vinegar and water for 30 minutes to overnight. This helps break down stubborn grime and eliminate bacteria. Rinse thoroughly afterward to prevent any lingering vinegar taste.
- Lemon Juice/Citric Acid: Similar to vinegar, the acidity in lemon juice or citric acid can help cut through sticky residue and refresh parts. A solution of 10% lemon juice or white vinegar can be used for soaking plastic components to prevent discoloration and absorb odors.
“Cleaning your juicer immediately after use is the single most effective tip to keep it pristine. Don’t give pulp a chance to dry!” – JuicerBest Admin, Expert Juicer Technician
Choosing a Juicer for Easy Cleaning
If you’re in the market for a new juicer, or simply want to appreciate your current one more, consider how certain design elements contribute to cleaning ease. Juicer manufacturers are increasingly designing models with user-friendliness in mind.
Materials and Design
Juicers made with high-quality, non-porous materials like BPA-free Tritan plastic or stainless steel are generally easier to clean and less prone to staining and odor retention. Look for designs with fewer interlocking parts, wider feeding chutes, and strainers with wider grooves instead of very fine mesh, as these designs minimize pulp accumulation and simplify scrubbing. Juicers with fewer tiny crevices and easy-to-remove silicone seals also make a significant difference.
Dishwasher-Safe Components
Some juicer models feature parts that are dishwasher-safe, offering the ultimate convenience. Always check your juicer’s instruction manual to confirm which parts can go into the dishwasher, as exposing non-dishwasher-safe components to high heat can cause damage or warping. Even if parts are dishwasher safe, a quick rinse beforehand is always a good idea to remove large pulp pieces.
Quick Juicer Cleaning vs. Deep Cleaning: When & Why
It’s important to understand the difference between your daily 5-minute quick clean and a less frequent, more thorough deep clean. The “under 5 minutes” method is designed for immediate post-juicing maintenance to prevent buildup.
- Daily Quick Clean: This is your routine after every use, focusing on immediate disassembly, rinsing, and light scrubbing with a brush and soapy water. It prevents fresh pulp and juice from drying, which is the primary cause of difficult cleaning.
- Weekly/Monthly Deep Clean: Even with regular quick cleaning, some residue or discoloration can accumulate over time. This is when you’d use baking soda, vinegar soaks, or citric acid to tackle stubborn stains, mineral deposits, and odors. Deep cleaning ensures your juicer remains hygienic, operates efficiently, and extends its overall lifespan.
Regular cleaning prevents the growth of harmful bacteria and mold, ensures optimal juice extraction, and keeps your appliance functioning smoothly. A well-maintained juicer not only produces better-tasting juice but also lasts longer, making your investment worthwhile.
Conclusion
Cleaning your juicer doesn’t have to be a daunting task that deters you from enjoying fresh, homemade juice. By embracing the “act fast” philosophy and incorporating these essential tips and tricks into your routine, you can consistently clean your juicer in under 5 minutes. Remember the power of immediate disassembly, the effectiveness of your cleaning brush, and the simple magic of warm soapy water. Make quick juicer cleaning a seamless part of your healthy lifestyle. What’s your go-to quick cleaning hack for your juicer?
Frequently Asked Questions
Is it really necessary to clean my juicer after every use?
Yes, absolutely. Cleaning your juicer immediately after every use is crucial to prevent pulp and juice residue from drying and hardening, which makes cleanup much more difficult. It also prevents the growth of bacteria and mold, ensuring your juice remains fresh and safe to consume.
What is the easiest way to clean a juicer screen?
The easiest way to clean a juicer screen is to use a stiff-bristled cleaning brush (often provided with the juicer) under warm running water. Scrub both sides of the mesh thoroughly and immediately after juicing to remove all trapped pulp fibers before they dry.
Can I put juicer parts in the dishwasher?
Some juicer parts are indeed dishwasher-safe. However, always consult your juicer’s instruction manual before placing any components in the dishwasher, as not all parts are designed to withstand high temperatures and could be damaged.
How do I remove stubborn orange stains from my juicer?
Stubborn orange stains, often from carrots or turmeric, can be effectively removed using a paste of baking soda and a little water. Apply the paste to the stained area, let it sit for a few minutes, then scrub gently. For a deeper clean, a white vinegar and water soak can also help.
My juicer smells, even after cleaning. What can I do?
Lingering odors often indicate hidden residue or bacterial buildup. Try soaking the disassembled, non-electrical parts in a solution of equal parts white vinegar and water for several hours or overnight. White vinegar is excellent at neutralizing odors and killing bacteria. Ensure all parts are thoroughly rinsed and air-dried afterward.