The thought of fresh, nutrient-rich juice is often a powerful motivator, but the process of setting up and cleaning a juicer can sometimes feel daunting. A complicated assembly and disassembly routine can easily turn a healthy habit into a chore, making your shiny new appliance gather dust instead of making delicious beverages. But what if setting up and taking apart your juicer could be as quick and intuitive as making your morning coffee? This comprehensive guide will demystify the process, offering clear, step-by-step instructions and expert tips to ensure you can assemble and disassemble your juicer quickly, regardless of its type, getting you from whole produce to a refreshing drink and back to a clean kitchen with minimal fuss.
Understanding Your Juicer: Key Components
Before diving into the assembly and disassembly process, it’s beneficial to familiarize yourself with the core components of most juicers. While specific designs vary, especially between cold press and centrifugal models, many parts serve similar functions.
At its heart, every juicer has a motor base, which houses the power unit and should never be submerged in water. Above this, you’ll typically find a juicing bowl or chamber where the magic happens. Inside this bowl, either an auger (for cold press juicers) or a filter basket with a spinning disc (for centrifugal juicers) extracts the juice. A feed chute or hopper allows you to introduce fruits and vegetables, often guided by a tamper or plunger. Finally, juice and pulp containers collect the separated liquid and fibrous waste, respectively. Knowing these parts by name and function will significantly streamline your learning curve, making assembly and disassembly a logical, rather than confusing, task.
Type 1: Cold Press (Masticating) Juicers – A Step-by-Step Guide
Cold press juicers, also known as masticating juicers, gently “chew” produce to extract juice, preserving more nutrients and enzymes. While they operate slower, their assembly and disassembly can be surprisingly quick once you know the sequence.
Assembling Your Cold Press Juicer
Assembling a cold press juicer typically involves stacking components in a specific order, often guided by alignment marks.
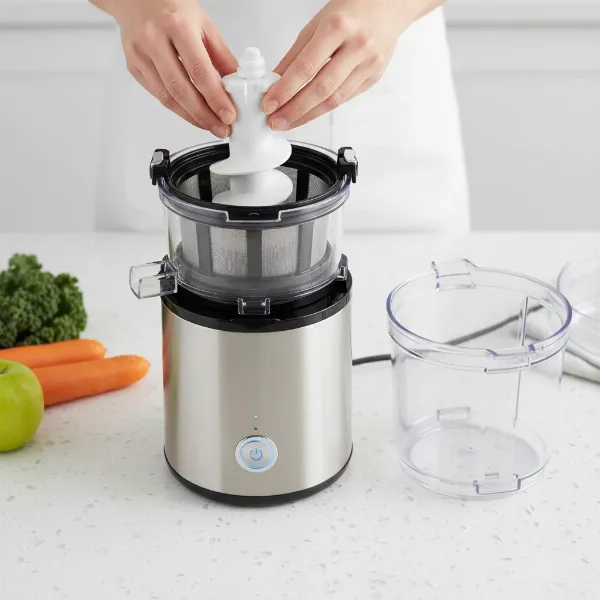 Cold press juicer components, motor base, juicing bowl, auger, and feed chute assembled.
- Start with the Motor Base: Place the motor base securely on a stable, flat surface. Ensure it’s unplugged before you begin.
- Position the Juicing Bowl: Carefully place the juicing bowl or chamber onto the motor base. Look for arrows or dots on both the base and the bowl; align them to ensure it seats correctly.
- Insert the Auger: Gently lower the auger (the large screw-like component) into the center of the juicing bowl. It should slide into place with little resistance, connecting with the drive shaft in the motor base.
- Place the Filter Screen: If your model has a separate filter screen or strainer, place it around or inside the auger, ensuring it’s flush with the bowl.
- Attach the Feed Chute/Hopper: Carefully place the feed chute assembly on top, aligning any marks (dots, triangles, or locking symbols). Once aligned, twist it clockwise (for most models, like the Ninja NeverClog) or push down until it clicks into a locked position. This part often has a safety mechanism that prevents the juicer from operating if not properly locked.
- Position Containers: Finally, place the juice collection jug under the juice spout and the pulp container under the pulp spout. You’re now ready to juice!
Disassembling Your Cold Press Juicer
Cleaning your cold press juicer immediately after use prevents pulp from drying and sticking, making disassembly much easier.
- Safety First & Empty Containers: Always begin by unplugging your juicer from the power outlet. Remove the juice and pulp containers and empty their contents.
- Unlock and Remove Feed Chute: Depending on your model, you might need to press a release button (as seen in the Ninja NeverClog™ Cold Press Juicer) or simply turn the feed chute/hopper counter-clockwise until the alignment marks unlock. Lift the entire feed chute assembly off the juicing bowl.
- Remove Filter Screen: If your juicer has a separate filter screen, gently lift it out.
- Remove the Auger: Grasp the auger and gently pull it upwards. If it feels stuck, try wiggling it slightly from side to side while pulling, as demonstrated with the Optimum 600XXL Cold Press Juicer. Avoid forcing it.
- Lift the Juicing Bowl: Carefully lift the entire juicing bowl or chamber straight up from the motor base.
- Separate Smaller Parts: Some models may have a detachable pulp spout or other small components that can be twisted or pulled off the main feed chute for thorough cleaning.
Type 2: Centrifugal Juicers – Quick Setup and Breakdown
Centrifugal juicers use a fast-spinning mesh filter basket with sharp blades to shred produce and separate juice from pulp. They are known for their speed in processing ingredients and often boast simpler assembly/disassembly compared to cold press models.
Assembling Your Centrifugal Juicer
Centrifugal juicers often use a clamping mechanism for quick and secure assembly.
- Place the Motor Base: Position the motor base on a firm, level surface and ensure it’s unplugged.
- Attach the Pulp Collector/Base: Place the main pulp collector base onto the motor unit. This part usually includes the juice spout.
- Insert the Filter Basket: Carefully lower the stainless steel filter basket (with the grater disc at the bottom) into the pulp collector, ensuring it’s seated firmly on the drive shaft. Give it a gentle spin to confirm it moves freely.
- Attach the Lid with Feed Chute: Place the lid, which contains the feed chute, on top of the filter basket and pulp collector. Align any arrows or guides.
- Secure Locking Arms: Most centrifugal juicers have two locking arms on the sides. Push these arms upwards and inward until they securely latch onto the lid. The juicer will not operate unless these are properly clipped into place.
- Position Containers: Place the juice jug under the juice spout and the pulp container (if separate) at the back or side.
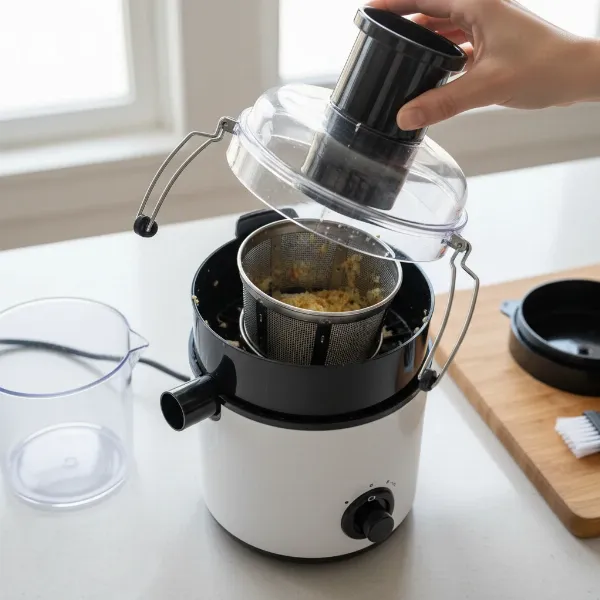
Disassembling Your Centrifugal Juicer
Disassembly for centrifugal juicers is often even faster, largely due to fewer individual components.
- Unplug and Clear: Always unplug the juicer from the wall socket first. Remove the juice collection jug and the pulp container.
- Unclip Locking Arms, Remove Lid: Release the two locking arms by pulling them outwards and downwards. Once unclipped, lift the entire lid (with the integrated feed chute) straight off the juicer.
- Lift out Filter Basket: Carefully grasp the filter basket and lift it straight up and out of the machine. Be mindful of the sharp grater disc at the bottom.
- Remove Pulp Collector: Lift the pulp collector section from the motor base.
This streamlined process makes centrifugal juicers very appealing for those prioritizing speed and minimal cleanup time. As shown with the Philips Viva Juicer, unclipping side arms and removing sections is a straightforward process.
 Centrifugal juicer components being disassembled, showing motor base, pulp collector, filter basket, and lid.
Essential Tips for Speed and Efficiency
Mastering the mechanics is only part of the equation. A few expert tips can significantly cut down your assembly and disassembly time.
- Familiarize Yourself with Your Model: The more you use your juicer, the more intuitive the process becomes. Practice makes perfect, and with each use, you’ll build muscle memory for the specific alignment points and locking mechanisms of your particular model.
- Know Your Alignment Marks: Most modern juicers feature dots, arrows, or triangles that indicate where parts should align. Always look for and use these indicators. They are designed to prevent incorrect assembly and often act as safety interlocks.
- Immediate Cleanup is Key: This cannot be stressed enough. Juice pulp, especially from fibrous vegetables, can dry and harden quickly, making parts incredibly difficult to separate and clean. Rinsing immediately after juicing with warm water can prevent this.
- Organize Your Parts: Keep all removable juicer components in one designated area, perhaps a tray or a specific cabinet shelf. This prevents hunting for individual pieces and ensures you have everything at hand for quick assembly.
- Safety First, Always: Before touching any internal components, always ensure your juicer is unplugged. This simple habit prevents accidental activation and potential injury.
Troubleshooting Common Assembly Hurdles
Even with the best instructions, you might encounter a snag. Here are solutions to common assembly and disassembly issues:
- Parts Not Fitting: If a component doesn’t slide or click into place easily, do not force it. It usually means something is misaligned. Remove the component and re-check the alignment marks (dots, arrows, or interlocking grooves) with the previous part. Ensure no small pieces of fruit or vegetable are obstructing the fit.
- Lid Not Locking: This is a frequent issue, especially with cold press juicers. The lid often won’t lock if the auger or juicing bowl beneath it isn’t perfectly seated. Go back a step, ensure all lower components are correctly aligned and firmly in place, then try the lid again. For centrifugal juicers, ensure the locking arms are fully extended and clip securely over the lid.
- Stuck Auger or Filter Basket: If an auger or filter basket is stubborn to remove, a gentle wiggle from side to side while pulling upwards can help dislodge it. Avoid strong, sudden jerks, which could damage the plastic components. Dried pulp is a common culprit here; if it’s dried on, a quick soak in warm, soapy water might be necessary before it can be removed.
- Juicer Won’t Turn On After Assembly: After assembly, if your juicer fails to power on, the most common reason is that a safety interlock hasn’t engaged. Double-check that all parts—especially the lid and locking mechanisms—are correctly aligned and securely locked.
Buying Guide: Choosing a Juicer for Easy Assembly & Disassembly
When investing in a new juicer, ease of use beyond juicing performance is a crucial factor. Opting for a model that’s simple to put together and take apart will significantly enhance your daily juicing experience.
- Fewer Parts, Simpler Life: Look for juicers with a minimal number of individual components. Generally, fewer parts mean less to assemble and less to clean.
- Clear Alignment Indicators: Prioritize models that feature obvious and intuitive alignment marks (like color-coded dots or prominent arrows). These guide you effortlessly through the process, reducing guesswork.
- Simple Locking Mechanisms: Test the locking mechanisms if possible. Easy-to-engage clamps for centrifugal juicers or large, ergonomic release buttons for cold press models (like the orange release button on the Ninja NeverClog) contribute to a smoother experience. Avoid overly complex or stiff mechanisms.
- Dishwasher-Safe Components (Except Motor Base): While the motor base is never dishwasher safe, check if the other removable parts are. This dramatically speeds up the cleaning phase, which is inextricably linked to disassembly efficiency.
- Consult Online Reviews: Pay close attention to user reviews that specifically mention “ease of assembly,” “quick cleanup,” or “simple to take apart.” Real-world user experiences are invaluable for gauging daily convenience.
“A well-designed juicer shouldn’t intimidate you. Simplicity in assembly and disassembly is a hallmark of thoughtful engineering, making it a joy to use daily.” – John Smith, Juicer Design Specialist at FreshStart Appliances
Conclusion
Mastering the quick assembly and disassembly of your juicer is not just about saving a few minutes; it’s about transforming your juicing routine from a potential chore into a seamless, enjoyable part of your day. By understanding the core components, following the type-specific steps for cold press and centrifugal models, and implementing a few expert tips like immediate cleaning and part organization, you can significantly boost your efficiency. This mastery contributes directly to a more consistent juicing habit, ensuring you consistently enjoy fresh, homemade juice without the hassle. So, go ahead, confidently assemble your juicer, extract every last drop of goodness, and then swiftly disassemble it, knowing that convenience is now a part of your healthy lifestyle. What’s your go-to quick juicing tip that saves you time in the kitchen?
Frequently Asked Questions
How often should I clean my juicer?
You should clean your juicer immediately after every single use. This prevents pulp and juice residue from drying and sticking to the components, which can make disassembly and cleaning significantly more difficult and time-consuming.
Can I put all juicer parts in the dishwasher?
No, typically not all juicer parts are dishwasher safe. The motor base, which contains electrical components, should never be put in the dishwasher or submerged in water. Most other removable parts, such as the juicing bowl, auger, filter, and containers, are often top-rack dishwasher safe, but always check your specific model’s manual.
What if my juicer parts are stuck during disassembly?
If parts are stuck, avoid forcing them, as this can cause damage. First, ensure the juicer is unplugged. Then, try gently wiggling the stubborn component while pulling. Often, dried pulp is the culprit; a quick soak in warm, soapy water can help loosen residue, making it easier to separate the parts.